 No Junk mail. No spam Calls. Free quotes


Ready to upgrade your boring kitchen countertop with a lovely slab of quartz? Before you start shopping, you will need to know how much quartz you will be purchasing.
Quartz slabs are charged by the amount of square footage being installed, as well as several other additional factors. Before speaking with a fabricator or quartz manufacturer, you should measure your current countertop to have an estimation on hand.
Table of Contents
Materials For Measurements
To find your countertop dimensions, you will need some tools to help measure and record the information.
1. Tape Measure: A retractable tape measure with a steel edge should be the first tool to have. Tape measures can be obtained at most home development or supply stores like Home Depot, Lowes, or Staples. Avoid using loose or fabric tape measures as they can bend and wrinkle, providing inaccurate measurements.
2. Grid/Graph Paper: Grid paper is easier to perform calculations and understand the dimensions of the countertop in a sketch. Normal paper can be used as well, but more work will be required to record the measurements of the countertop. Grid paper makes the process simpler.
3. Pencil: A pencil with a non-smudging eraser to sketch your countertop on the grid paper. Mistakes tend to happen and sketching in pencil is easier to erase than with ink. A non-smudging eraser will also remove the previous mistakes without leaving residue, making for a cleaner space to redo your sketch.
4. Calculator: Use a calculator since measurements require a lot of numbers, multiplication, and division. It makes the calculations a lot easier than trying to do it mentally. If you feel comfortable without a calculator, then always make sure to double check your math.
[get_quote]
Measuring Your Countertops
With all your tools ready, we can start taking our first measurements. Keep in mind that the numbers you obtain will be a general rough estimate for the quartz countertops. Your sketch may not be to scale, but the purpose of these measurements is to give the fabricators a better picture of what space they are working with.
Step 1: Sketch Layout
First, start by taking your pencil and sketching the general design of the room on the grid paper as if looking at it from above. Sketching from above makes the process much easier to record measurements. Make sure to include sink, stove, fridge, walls, edges, islands, and chairs. Sketch what the room will look like once the remodel is complete. For instance, if the new quartz countertop will have a drop-in sink or wall-mounted dishwasher in the cabinets, then incorporate those elements into the sketch.
If you are thinking of moving or remodeling your cabinets to match your new quartz countertops, then sketch where the new cabinets will be placed.
While looking at the sketch, break down each piece of the countertop into blocks or sections. For example, if the countertop stops at a corner and starts again at the other side, then break the countertop into two sections. Mark each section for better organization like Section A and Section B. This will help with measuring countertops with angles like L or U-shaped kitchens.
Step 2: Measure Countertops
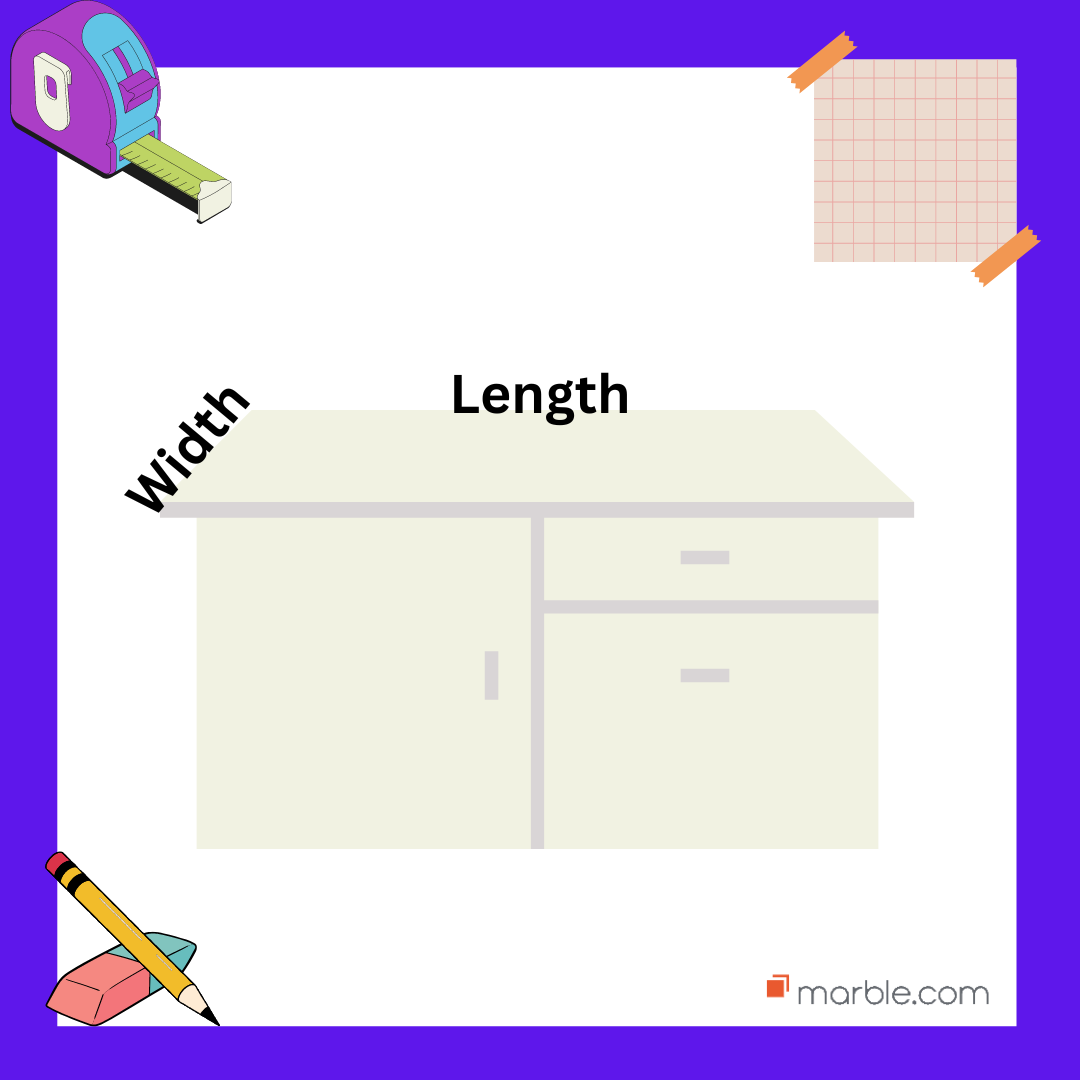
To make things easier, measure everything in inches and convert to square feet later. To measure the countertops, we will be obtaining the length and width.
Length is the lateral or sideways measurement to determine how long something is from end to end.
Width is the measure to determine how wide an object is from side to side. In this case, the width of a countertop is how deep it goes from the back wall to the front edge.
Take your measuring tape and measure the length of one section of the countertop. Measure the entire length, including the sink or built-in appliances until you reach a wall, cabinet, or edge. After measuring the length of that section, record the number on your sketch in the corresponding space.
Next, measure the width of that section. This would be from the back wall to the front of the countertop. Record that number on the sketch and repeat with the remaining sections of your countertop.
For countertops that have an overhang, factor in the additional inches it incorporates. On average, quartz countertops have an overhang of 8-12 inches out for seating and prep space. Quartz countertops with more than 12 inches of overhang require additional support to prevent them from breaking. If you are thinking of adding an overhang to your new quartz countertops, sketch how far out the overhang will reach.
Step 3: Measuring Angles
Measuring angles can be a bit trickier due to overlap, but possible if the countertop is broken down into sections. As previously stated, separating the countertop into marked sections such as A, B, or C will make it easier to find that section's dimensions.
To measure angles, measure the length and width of section A, then record the information on the sketch. Once section A is complete, repeat with section B, C, etc.
[get_quote]
Step 4: Measure Cabinets
Similar to the countertops, measure the length of the countertops first from end to end, then record the number on the sketch. When measuring the width, it is advisable to factor in 1-1.5 inches for possible overhang.
Step 5: Calculations
Now that we have the dimensions of the countertop, we can start calculating the area. To find the area of an object, multiply the length times the width in your calculator. For example, the area of section A would be the length times width of what was measured.
Repeat this process for each section of the countertop to get their area.
Next, we will get the total area of the whole countertop. Simply take the area from all the sections and add them together to get the total area.
The final step is to convert the total area number into square footage. To do this, take the total area number and divide it by 144 to get the total square footage of the countertop.
Congratulations, you now have the dimensions for your countertops and approximately how much quartz you will need for your new remodel!
[get_quote]
Simple Recap
1. Use a pencil to sketch the layout of the room on grid paper. Include everything in the room as well as upgrades to the finished remodel. Separate the countertop into sections which are clearly marked.
2. Use a retractable measuring tape to measure the length (side to side) and width (front to back) of the countertop. Stop at any walls, angles, or turns. Measure each section and record information on the sketch.
3. Use a calculator to multiply length times width to get the area of each section.
4. Add the areas of all the sections together to get the total area.
5. Dividing the total area by 144 to convert the area into square footage.
Additional Tips
Here are a few helpful tips to keep the process simple.
1. Keep in Inches: Measuring everything in inches first and converting to feet later reduces the number of individual calculations for each section.
2. Measure twice: Always measure each section twice to make sure you are getting accurate numbers.
3. Round Up: Working with whole numbers is easier than decimals and fractions. Round up to the nearest whole number to keep your calculations simple.
4. Hire an Expert: If you are not comfortable and unsure if you are getting the right measurements, then call an expert. Fabricators and installers use digital devices which incorporate a laser to measure the countertops.
Conclusion
Following this guide will help you get a rough estimate of your countertop space so you can speak to a quartz fabricator and know how much quartz you want to install. Quartz fabricators will take their own measurements as well as others to understand the full scope of the project, but having these numbers on hand gets you one step closer to your new quartz countertops.
 Why you can trust Marble.com


 The article helped me immensely
 I’m now more informed on the subject
 I have questions about Marble.com
 The article was not accurate at all
 There is a serious lack of information
 I have questions about Marble.com