Table of Contents
While looking at your granite countertop, you may happen to come across small cracks or chips in the stone. There is no need to panic, as granite repair is a relatively simple process. Granite countertops are the focal point of any home, especially in the kitchen. Because of this, you will want them to retain their high quality looks for many years. Repairing any small cracks or chips on your own can help you keep your granite countertops looking nice, as well as save you money that you would otherwise pay to a professional to have the job done.
Before you repair your granite, you will first need to determine what type of damage the stone has. When assessing damages, many homeowners mistake fissures for cracks in the granite. There is a distinct difference between the two that is described in further detail below.
[get_quote]
How to Assess the Damage
To assess damages to your granite countertop, you will need to consider a few factors before moving onto any repairs you will make. These include learning the difference between a crack and a fissure as well as knowing if the crack requires repair.
What is the Difference Between a Crack and a Fissure?
Although it may look like a crack in your granite countertop, a fissure is a naturally occurring separation that happens in many natural stones. While a crack can run deep into the surface of the stone, a fissure is smooth and level with the stone. An additional way you can determine if your granite countertop has a crack or a fissure is that fissures occur in numerous places throughout the stone, while a crack is typically only seen in the area where the granite was exposed to high stress. Areas of high stress usually include sink and cooktop cutouts, as well as the corners of the countertop.
How Do I Know If I Should Repair the Crack?
Not all cracks in your granite countertop need to be repaired. While something such as a fissure may leave you unsatisfied with the look, fissures are naturally occurring in the stone, and do not pose any threat to the long-term structural integrity of your granite countertop. Cracks on the other hand are typically much larger and should be repaired as soon as possible before they get any worse.
How to Repair Hairline Cracks and Chips
When you have minor damage to your granite countertop, such as hairline cracks or chips, they can be easily fixed. This is a Do-It-Yourself project as long as you purchase the materials that are necessary for the job.
After you have established that you should go through with fixing the small crack or chip, you need to prepare your materials. Below is a list of materials that you will need, as well as a step-by-step guide on the repair process.
Materials You Will Need
You will need the following materials to complete the job:
-
Grinder (equipped with diamond grinding bit)
-
Dust mask
-
Epoxy that is specifically designed for use with granite
-
Painter’s tape
-
Tongue depressor
-
Cleaner designed for use with granite
The Repair Process: Step-by-Step
When fixing a small damaged area on your granite countertop, you will need to begin by collecting granite dust from an area close to the one you are trying to repair.
Step 1: Collecting Granite Dust
To collect granite dust, use a grinder that is equipped with a diamond grinding bit. You can collect the dust from an area that is not noticeable, such as the underside of the countertop. The reason you need to collect granite dust is to color the epoxy to match the area around the repair site. Always use a dust mask when completing this step, as you will not want to breathe the granite dust into your lungs.
Step 2: Cover the Surrounding Area
Before filling the crack, you will want to cover the area around it so you do not get any epoxy on the rest of the countertop. Using painter’s tape is the recommended method for this step. Painter’s tape will be easy to remove later.
Step 3: Mix the Epoxy
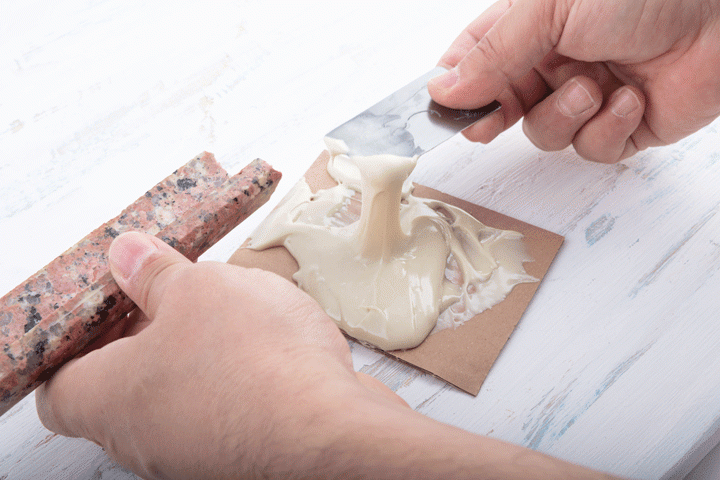
Next, you will need to mix the epoxy. To do this, follow the instructions that come with the epoxy. After this is done, you can mix in the granite dust that you collected. Mix until your epoxy and granite dust mixture is a similar color to the granite countertop. A good tool to mix with (and apply the epoxy with) is a tongue depressor. It will work well because the area you are fixing is not very big.
Step 4: Apply the Epoxy and Fix the Crack/Chip
Lastly, apply your epoxy mixture to the damaged area. After the area is filled, smooth it out.
Different epoxy products will have different drying times, but in general, your countertop should be as good as new in about 24 hours. Make sure not to touch the area where you made the repair until the 24 hours are over.
[get_quote]
How Do I Reattach A Broken Piece of Granite?
There are times when small pieces of a granite countertop, especially on any corners, will break off. You do not need to be devastated if this happens, as you can easily repair broken pieces much like you can small cracks and chips. The process for reattaching broken pieces of granite is explained below.
Materials You Will Need
You will need the following materials to complete the job:
-
Grinder (equipped with diamond grinding bit)
-
Dust mask
-
Epoxy that is specifically designed for use with granite
-
Painter’s tape
-
Tongue depressor
-
Cleaner designed for use with granite
-
Shims
Step 1: Supporting the Broken Section
To begin the process of reattaching a broken piece of granite, you need to place support underneath the broken section. Use a form of metal support that is capable of holding the granite.
Step 2: Mask Off the Surrounding Area
As with small crack and chip repairs, you will also need to use painter’s tape to cover the surrounding areas of the countertop before reapplying the broken piece. You do not want any of the epoxy to get on other areas of the countertop.
Step 3: Clean the Area
Make sure that the area around the repair site is clean before you reattach the broken piece. If the area is not clean, you will need to clean it and let it dry before doing the actual repair.
Step 4: Collect Granite Dust
Use the grinder equipped with a diamond grinding bit to collect granite dust from an area near the repair site. You can collect from an area that is not visible, such as the underside of the countertop. The granite dust that you collect will be mixed with the epoxy in order to create a color that matches the granite.
Step 5: Mix the Epoxy
Mix the epoxy by following the instructions that it provides. After you do this, you can mix in the granite dust you collected.
Step 6: Apply the Epoxy
Apply the epoxy by following the instructions provided with it.
Step 7: Reattach the Broken Piece
Attach the broken piece of granite back onto the larger piece it broke off from. Be very careful when you are reattaching.
Step 8: Make Sure Reattached Piece is Level
Put shims underneath the reattached piece of granite to make sure it is level with the larger piece it broke off from.
Step 9: Apply Second Coat of Epoxy
Add an additional coat of epoxy. This is done to smooth out the surface. Use the same process listed above for mixing the epoxy.
How Can I Avoid Damages to My Granite Countertop?
Granite is one of the strongest countertop materials that you can have in your home. However, as evidenced by the theme of this article, the natural stone can get damaged if you are not careful around it. Below are some ways that you can avoid potential damages to your granite countertop.
Seal Your Countertop
All granite countertops must be sealed. This process should occur roughly once every year. Sealing a granite countertop will prevent any liquid from getting into cracks. If liquid does find its way into any cracks in the granite, your stone can be weakened, making it more susceptible to damages.
Use Caution with Heavy Kitchen Items
Another way to keep your granite countertop free of damages is to exercise caution when handling any heavy kitchen items around the surface. If you drop a heavy pot or pan on your granite countertop, the surface can chip or an area such as a corner could break off.
Use a Cutting Board
Although granite can withstand you cutting right on it, it is still a good idea to use a cutting board. Never cut too close to any edges on the countertop.
Avoid Excess Pressure
Avoid putting any excess pressure on your granite countertop. For example, do not sit or stand on the countertop. Doing so can eventually cause damages.
[get_quote]
Repair Any Cracks or Chips
If you notice any cracks or chips in your granite countertop, you should repair them as soon as you possibly can. While a small crack or chip may seem easy to fix, if you leave it damaged, you can have an even bigger problem if it turns into a larger crack or chip. It is always better to play it safe when it comes to repairing any damages.
While it may sound like a daunting task when you first think of repairing your own granite, the process is actually very simple. You should always have a professional install your granite countertops; however, minor repairs do not require one. The process is also relatively quick, as your countertop should be back to normal about 24 hours after you do the repairs.
Granite countertops are one of the best investments you can ever make for your home. The beautiful natural stone will last for a very long time if you take good care of it. Granite’s good looks and durability make it a highly sought-after countertop material for homeowners. One of the ways you can help keep your granite looking good is to immediately repair any cracks or chips that you notice, even if they are small. Doing so can not only save the look of your countertop but can save you a lot of money.


 The article helped me immensely
 I’m now more informed on the subject
 I have questions about Marble.com
 The article was not accurate at all
 There is a serious lack of information
 I have questions about Marble.com